Thursday, July 29, 2010

100 Followers!!!!

Update.....

Thanks for your comments the Winner will be announced tomorrow (Monday)!

Like I said yesterday, I can't believe that I just started this blog and already have 100+ people that enjoy my craftiness! I LOVE all the sweet  comments you leave me ;)!!!! So I have decided to give away a "handmade" blog candy! You've probably seen the portfolios with note cards that I have made in the past. Well, I have 2 more that I made and can easily personalize once I found out the winner! Here are your choices:

One was made with SU's Baja Breeze and Chocolate Chip.
The other one is with SU's DSP with "Cherries" and Riding Hood Red.
All you have to do is leave me a comment including 2 things:
1. What is your favorite project that I have posted so far
2. Which portfolio/card set would you like to win

I will leave this open until Sunday night at 6pm PST, and then I will pick a winner (and personalize their gift!). Thanks again for being a follower of Craftin on my door, and I look forward to reading all your comments!
~Kristy

Guest Designer day!

Hi Everyone! Today I am the guest designer over at She's a Sassy Lady! (You can click HERE or go to http://shesasassylady.blogspot.com ) Please "hop" on over and check out my post "Christmas in July part 4!" While you're over there I would LOVE for you to leave me a comment! ;) 
Sneak peek:

My followers are fantastic, and I just realized that I hit "100" followers on Tuesday!!! (Sorry things have been a little crazy with the Little Pickle Princess teething and all!!!) I am seriously amazed that I started this blog a MONTH ago and already have 100 followers! Thanks for all your kind comments! I would LOVE to give away a "hand made" blog candy to one of my fabulous followers! Check back tomorrow and I will post all the details. Thanks again!

Tuesday, July 27, 2010

FCCB Challenge Me Monday #20

Today's challenge at Fantabulous Cricut was to create a card or project using an animal on any Cricut cartridge. Well, my Little Pickle Princess finally got 2 teeth this past week, and I knew I just HAD to make this layout:
I took two pictures of her and her "2" new teeth, and as soon as I print them out I can just stick them right on top of the photo mats!
Paper Recipe:
Photo mats, wood grain, and journaling background- DCWV the Green Stack
All other papers-Stampin' Up

I wanted the title to have a "chipboard" effect so I cut each letter 3 times and layered them on top of each other. I used Storybook and cut each letter at 1 1/2". Then I used the "Shorty" feature and cut the "2" at 1 1/2" (3 times) also. Next, I ran the "2" through my Xyron (upside down) and then glittered it. I wanted the "2" to have a little more dimension so I also used 3D-dots to "pop" it up on top of the little white beaver teeth. The wood grain base was cut using the Slumber Party cartridge and the "circle charm key" at 4 1/4".
Can you see all the little "bite" marks? I used my Stampin' Up scallop punch to make the bite marks around the edges of my page.

I used the Create A Critter cartridge and cut the beaver out at 3 1/4". I cut the teeth out at 5 1/2" and then used ultra fine glitter to make them sparkle! Then I used 3D-dots to "pop" up this little cutie!
I used the Cherry Limeade cartridge and my lovely gypsy to make the sayings "Our Little Beaver," and "July 2010."
The ribbon is from one of my local scrapbook stores. I typed up my journaling on the computer and changed the font color to dark brown so that it would match my papers. Then I changed a few words here and there to red. I used my SU punch again to take a "bite" out of the corner, and then added a couple yellow blings!
I can't wait to print out my pictures and add them to this layout! It was super easy, and I think it turned out pretty darn cute!
 Do any of you have "Little Beavers" out there? Which teeth usually come in next?

I hope I've inspired you to scrap something special today! Happy crafting! ;)

Friday, July 23, 2010

Cricut Cardz Challenge #34

Hello to all my crafty friends! This weeks Cricut Cardz Challenge is to make a card using a cake, cupcake, cookies or candy and any cartridges, colors or theme you'd like. These are all things I LOVE so last night I decided to get crafty, and here's what I came up with for my entry:
I know, another 5 x 5 card! I just love them! Pretty cute, right?! Here's the recipe:
Scallop circle-Mini Monograms cartridge {cut at 5 1/4"}
Lollipop-Mini Monsters cartridge {cut at 4 1/2"}
Background circle and wrapped candies-Slumber Party Lite cartridge {all cut at 4"}
All papers, ribbon, and stamped sentiment are from Stampin' Up
Bling-Michaels
I used my paper piercer to pierce a hole in each scallop. Then, I ran the hot pink "layer" pieces through my Xyron (upside down) and glittered them for the "sugared" look! To "pop" up the candies I used SU dimensionals for the wrapped candies, and 3D-Dots on the lollipop (to make it "pop" up a little higher).
I just LOVE how glittery and "sugared" the candies look, and I had to add a mini bling next to the sentiment! I think that this just might be the perfect Thank You card for one of my dear friends!
Happy craftin' everyone!

Thursday, July 22, 2010

Christmas in July part 3

Hi everyone! Here's another Christmas gift idea.
 I found these cute little cards at Michaels, and decided to "doctor" them up with the help of my fabulous Cricut! Most of the cuts were from the Christmas Cheer, Accent Esstenials, and Doodlecharms cartridges. I also used Stampin' Up papers, punches, ribbon, and stamps. As you can see I also added some bling!

Here's another version I made:
The cute little snowmen on these boxes are from the Gypsy wanderings cart on the Gypsy. Don't you just love the cute little pizza boxes?! They were super easy to make with the help of my super duper Scor-pal! The Scor-pal website also has tons of tutorials on how to make different projects like a pizza box. I played around with the dimensions so that 3 x 3 cards would fit perfectly inside.

I had a group of girlfriends over and we made a bunch of these together. It's always more fun to "create" and craft with a friend! So, call a friend and invite him or her over to craft I'm SURE you'll both have a great time! Happy crafting!

Wednesday, July 21, 2010

Christmas in July???

Can you see the snow falling?! It is soooo stinkin' hot here in Las Vegas! Maybe the thought of snow will help cool us all down? I'll have more videos (like the one below) tomorrow. Craft away, and stay cool!

Storybook binder project for Kricut Krazy

Hi fellow crafters! I met a new friend on the Cricut Circle Message Board. Her name is Tangee and her blog is Kricut Krazy. Her goal is to make the projects from every Cricut cartridge manual (binder). She was looking for some guest designers to come in and help her out by making the projects on cartridges she does not have yet. So, I decided to help her out and make a few. I also decided to try out my video skills. Now, these are my first videos so please be kind. :) I promise to get a tripod soon!


Christmas in July part 2

Do you need to make a little "something" for a lot of people? Here's something that is quick, cute, and inexpensive:


These are the cute little embellishment containers that come in a group of six. I picked up mine at Michaels. I typed up the little tag on my computer, and cut them out. I attached an eyelet and a piece of thin ribbon. I cut a strip of paper and glued it around the container like a "belly band." I used the same paper to punch out a circle and glue on the top of the lid. Then I tied a piece of ribbon from Michaels around the "belly band," and used the thin piece of ribbon to attach the tag. Lastly, I filled the jars with my favorite Kisses, Candy Cane Kisses!

Here is another variation:
Merry "KISS"mas in July to all of you! :)

Tuesday, July 20, 2010

Christmas in July part 1

It's going to be here before we know it...Christmas! Here are some cards that I made up a while back (I was in my big inking phase, I need to ink up somethings again!).
I cut flowers from Accent Essentials and layered them with Prima flowers and brads.
I stamped and cut the letters to make the "ho ho's". I also used ornament gift tags for the "o's".
I cut flowers again (sorry I can't remember what cartridge the polka dot flower is from?), and layered them for a fun vintage look. I also used rub-ons for the sayings.
A lot of this paper is from  Making Memories FA LA LA LA.
More "ho ho" cards using gift tags.
I just love ribbon and rick rack!
I REALLY need to get started on my Christmas cards (and actually send them out this year!), and start making gifts! Any cute ideas out there? I have a couple little gifts I am going to share with you over the next couple of days. If it wasn't 117 degrees here in lovely Las Vegas I might be able to say, "It's beginning to look a lot like Christmas (in July)." I am definitely wishing for cooler weather! My advice is to stay inside and craft! :)

Sunday, July 18, 2010

Cheer Sashes

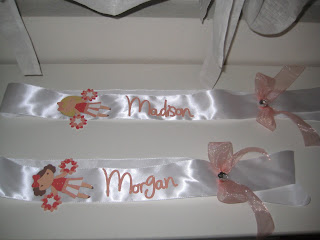
My Little Pickle and I were invited to an end of Cheer Camp show.  Two of my former kindergarten students were a part of this camp, and on Friday they showed off cheers that they had learned, did their jumps, and more! I knew my Little Pickle would LOVE watching the "big" girls do their thing, and I couldn't go empty handed! So, I made them each their very own Cheer Sash:

I got the idea from a very creative someone on the Cricut MB. She had made Luau sashes for a camp (I went back to try to find her name and the post is gone?!)

I used my Gypsy for this project, and it made it so easy! I didn't have a cartridge with a "cheerleader" on it, so I used the "rocker girl" from Once Upon A Princess and did not add all the details. I also did not have any "pom poms" so I used the "lime" flower on Cherry Limeade and layered it for the effect!
My favorite font to weld is on Wild Card! I put the names together and welded them on my Gypsy.

Paper Recipe:
All glitter paper-DCWV glitter stack
Peach-Bazzill
Brown-Stampin' Up Close to Cocoa
White-Stampin' Up Whisper White

The ribbon for the sash is 2 1/2" white ribbon from Michaels. The bows are made from Martha Stewart ribbon that was on clearance (a LONG time ago!), and the bling are Recollections jumbo brads. I used hot glue to glue everything down (even the sash under the bow), and lit the ends of the ribbons with a bbq grill lighter so that they would not fray!

My friend Hilary is here in Las Vegas for work, and is staying with us for a week (I LOVE to craft with her!). We decided to make a couple of these sashes for her girls. I know they will LOVE them!
Aren't they all just so stinkin' cute?! I wish I had a reason to wear one of these around the house all day! Do I really need a reason? :) I hope you all have a chance to create a little something today!

Friday, July 16, 2010

More Blog Awards?!!!

WOW! Thank you Anna at Anna's Papercrafts for these blog awards!
She said that I have a "nice little craft room and her projects really inspire me!" Thanks again, Anna! I will have to pass these out soon!

Thursday, July 15, 2010

Forever Young Purse/Card sets

I finished! A while back Robyn at My Pink Stamper made these cute little purses, and I made some with a friend of mine. Well, she remembered them and asked me the other day if we could make some more. And I said "OF COURSE!" I love crafting with my friends!!!! So, like I said in yesterday's post my friends Christianna and Shannon came over and we whipped up a bunch of these little puppies! (They make fantastic little gifts!) Here's a picture of all 9 that I made:
Pretty cute right?! They each hold 4 little note cards and envelopes! I'll show those pictures in a minute.
Here's my staging area where I got everything ready to go.
Here are my directions from MPS that I had written out (I keep all of my cards/projects in the same little notebook so that I can keep them all handy!). I had to change them a little because the cards that I used this time were a little smaller then 3 x 3. I also added a little bling to the center of my flowers instead of a stamp.
I sketched out each of my purses and cards to figure out which papers, and ribbons to use. A HUGE Thank You to Megan at Above Rubies Studio for making these great scrapbooking sketch sheets!!! She has some for layouts and some for cards!
So, how do we make these?
All of the cuts are from the Forever Young cartridge page 70 of the manual.
For the purse cut using "Fit to Page," button, and the "purse" feature button. This cuts the purse at 5 1/4".
For the flowers cut all at 3 1/4":
*The biggest flower- "flower7" main button
*The middle flower-"shift" button and main button
*The smallest flower-"layer" button and main button

For the cards you would cut a 3" x 6" pieces of card stock and then fold it in half. I found all of these cards in the $1 bin at Michael's, and they came with their own envelopes too! Each set had enough cards to make 2 purse sets!
For these smaller cards cut a piece of card stock at 2 1/2" x 2 1/2". I loved the little images on most of these and did not want to cover them up, so I took a scrap piece of card stock and punched a circle in the middle with my Stampim' Up 1 3/8" punch.
I used this as a guide and held the long one over my square, and then punched the circle exactly where I wanted it.
Can you see the cute little cards amongst this mess?! See how you can still see the adorable little ice cream cone through the circle, now?
There are 2 flowers for these cards:
*The middle flower again-"shift" button and main button
*The smallest flower-"layer" button and main button
Look how nice the 4 cards and envelopes fit inside:
  Now, on to each set and the recipes:
 These are my favorite cards! I LOVE the little cherries and the color combo!
Riding Hood Red Paper-Stampin' Up
DSP Blue Polka Dot paper-Stampin' Up
White Paper-Recollections
Ribbon-Stampin' Up
And a little bling brought to you by Michaels :)
Chocolate Chip Paper-Stampin' Up
DSP Red Polka Dot Paper-Stampin' Up
So Saffron Paper- Stampin' Up
Riding Hood Red Ribbon- Stampin' Up
And again a little bling brought to you by Michaels :)
 Aqua and pink Paper-Recollections
Close to Cocoa (brown paper)-Stampin' Up
Green paper-Stampin' Up
Chocolate Chip taffeta ribbon-Stampin'Up
And again a little bling brought to you by Michaels :)
Why are there 3 pink purses you ask? Well, because pink is my fav color! No, actually these cards came with 12! So, that was enough to make 3 purses! I didn't punch out the middle for this card because it had a saying on it, and I just wanted to cover it up. I just LOVE how these turned out!
Pink paper-Stampin' Up
Chocolate Chip paper-Stampin' Up
Pink pattern paper-Me and My Big Ideas paper stack
White ribbon-Stampin' Up
And again a little bling brought to you by Michaels :)

I know that this was a long post, but I hope you enjoyed it! I wish I would have taken pictures of Chrisitanna and Shannon's sets too. They all are adorable and look so different! Have a crafty kinda day!