Saturday, April 30, 2011

Grad Bash Blog Hop

Welcome to the Graduation Day Blog Hop! This hop is going to provide you with lots of graduation ideas for all those graduates in your life.

If you have come from Sandra www.365daysofcricut.blogspot.com, you are in the right place. If you stumbled upon my blog and want to play along, you can do so by starting at Nadia’s Blog (www.nadiasbeautifulmess.blogspot.com).

I decided to make a lei that any graduate would {love} to receive!
I used a Child's Year cartridge and cut the diplomas at 2 1/2".
I didn't care for the "ribbons" that were attached to the diplomas, so I snipped them off.
Next, I cut a long piece of cello wrap, wrapped pieces of candy in it, and then tied a long piece of twine between each section.
Then, I tied on pieces of green tulle.

I thread the twine through the diplomas, rolled up the $money$, and tied it all together with a bow.
Yes, I still have my cap and gown from college (and I knew right where it was!).
It's fun, festive, delicious, and the money can be put to good use!
I moved the dress form to get a "full" picture, do you notice anything out of the ordinary?! Yes, my Little Stinkerbella could NOT let it be. It was hilarious!
In this pic she's saying, "Peek-a-BOO!"
Thank you for playing along. Your next stop is Jazmin www.jazzyscards.blogspot.com.

Here is a list of all participators:
ConGRADulations to all of the grads this year! <3 Kristy

Wednesday, April 27, 2011

Easter Party pics

My sister had us over for Easter dinner (the night before), and I just HAD to take a couple of pictures and share them with all of you! She is the party planner extraordinaire [LOVE you Christie!]! Here's a little something she just "whipped up" for the kids:
So stinkin' cute, and Stinkerbella {LOVED} them! My niece was also busy! She made the cutest and delicious cake pops!


I NEED to make some of these soon! Hope you all had a fabulous time with family and friends!
<3 Kristy
p.s. Please join me this weekend for a Grad Bash Blog Hop!

Tuesday, April 26, 2011

Oh {HAPPY} Day!

Oh Happy Day.....it's on it's way!
I can't wait to customize it with pink sides! They said that the sides will be coming out soon! Happy Mother's Day to me :) !
p.s. My hubby is the BEST! (Just in case he stops by to lurk! Love you honey!)

Sunday, April 24, 2011

Easter Cards

Hello my crafty friends and Happy Easter to you all! Here are a few cards I made for my family and friends. I used the new Elegant Edges cart (loving this cart and all its capabilities!) and Celebrate with a Flourish cart.
This card is a 5 1/4" by 5 1/4" square card. The scallop   was cut using Elegant Edges at 4.75" and I used Celebrate with a Flourish to cut the chocolate bunny at 4.50".
I also added a glittery tulle bow accented with twine, a button, and a pearl pin.
The stamps are a mixture of 2 of my favs! Pink by Design and My Creative Time. I {love} both of these sets!

 I used Hoppy Easter by Pink by Design and Color Me Happy by My Creative Time.
 Happy Easter to you all! <3 Kristy

Friday, April 22, 2011

Nine Years LO

Hello my crafty friends! My hubbie and I celebrated our 9 year anniversary back in July. This week I finally put together a LO for the pics. I got home from scrappin' at my sis-in-law's and saw the sketch for Frosted Designs sketch along Thursday, and you wont believe it but they are a PERFECT match! I promise I didn't see their sketch until I had already put my page together, my sis is my witness! ;) I {love} when things just work out, don't you?! Here is their sketch:

 And here is my page:


I used some glittery tulle, flowers, a pearl brad (thanks Kali!), and letter stickers for the title. This is the first time I've ever put a title on a flower, and I kinda like it. :)


I also added another page to make this a 2 page LO. My friend, Amanda, (my hubbie calls her the Cupcake Goddess!) helped me surprise my hubbie with a replica of the top of our wedding cake! It was spice cake and mannnnnnn was it deliciousssssss! (Wish I had some RIGHT now!) If you are in the Las Vegas area and are ever looking for someone to make cupcakes or cakes for a special occasion or just for fun let me know and I will put you in touch with the "Cupcake Goddess!"


I'm linkin' this delish LO to Frosted Designs Sketch Along Tuesday. Wish me luck! Thanks for stopping by today! I have a fun Easter LO to share with you later this weekend! Have a fab time with the family this weekend, and a Happy Easter! <3 Kristy

Thursday, April 21, 2011

Flower Girl LO

My Little Stinkerbella is going to be in my crafty friend's wedding this summer! Congrats Kindon! Kindon recently celebrated her b-day, and  I asked her what she wanted for her birthday.  She said that she would {love} a scrapbook page for her upcoming wedding. A flower girl page was her idea. Here's what I came up with:
I used Once Upon a Princess and All Mixed up cartridges.
I "sugared" the flowers, and layered them.
I cut two layers for the dress, added tulle, glittered ribbon, a small flower, and a pearl.
 
I'm also working on a matching Ring Bearer page. :)

This week is spring break and I'm LOVING my extra time with "MY" little Stinkerbella! I've also been able to get in some serious scrappin' time with my super sis-on-law! (Love that she now lives around the corner!) Have a great week my crafty friends! <3 Kristy

Tuesday, April 19, 2011

Bunny noses!

Today's my day to be the guest designer over at She's a Sassy Lady. If you have a moment please hop on over and leave me a comment. Here's my post:

Hi everyone! This is Kristy from craftin-on-my-door and I want to thank Sheila for allowing my to be her guest designer again today! I look forward to my monthly She's a Sassy Lady posts! Here's a cute and quick little project for Easter:
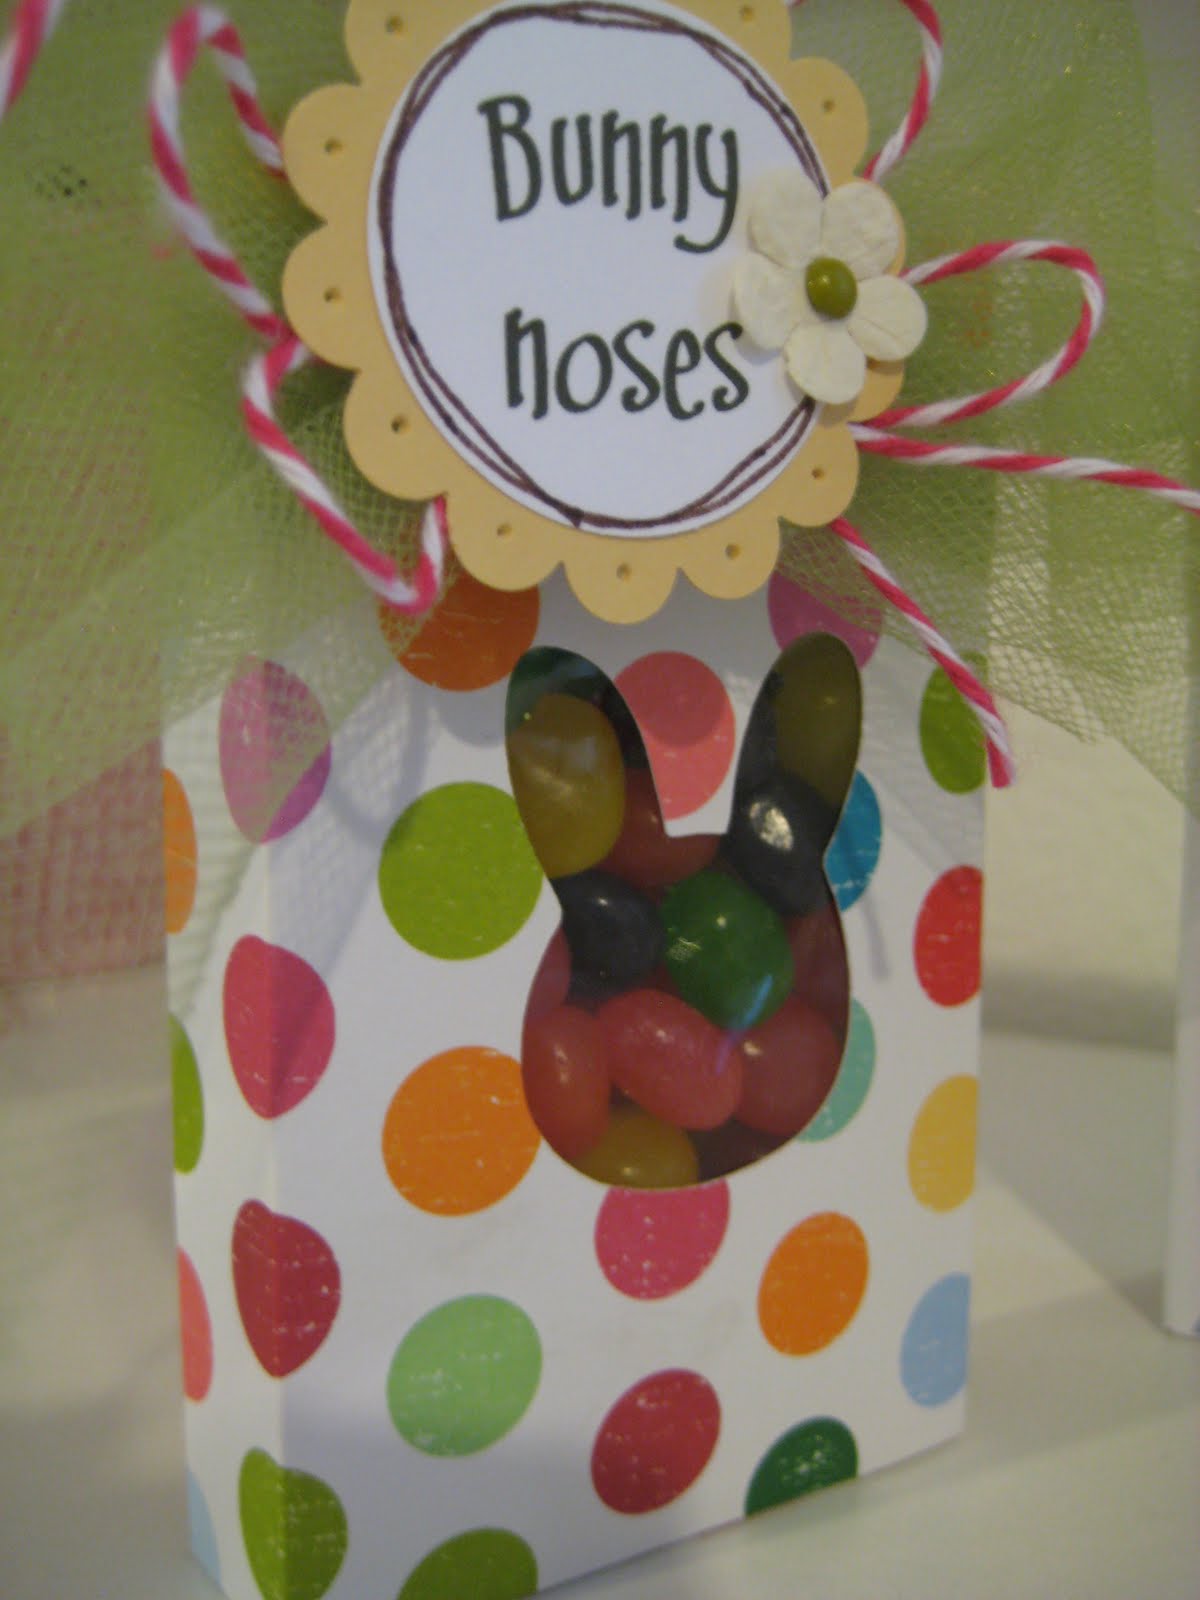
I used my trusty Gypsy and the Love Struck cartridge for the heart boxes and sized them at 6" each. Then I used the hide contour button to hide the hearts. Next, I placed a bunny head from Doodlecharms, and a rabbit from Celebrate with a Flourish over the hidden hearts. The bunny head was sized at 1.71" and the rabbit at 1.98".
I choose some "spring like" paper (from Me & My Big Ideas) and pushed cut. *FYI, I found that when I welded the rabbits onto the boxes, the Cricut didn't cut the score marks for some reason. 
 I just rolled with it, and scored where I needed to fold.
Before you glued the cute little box together you want to put something over the bunnies so that the jelly beans I mean Bunny noses don't fall out! I use pieces of packaging that I have in my stash. This piece was from a set of Halloween pins.
Just cut a square a little bigger then needed and add adhesive to the edges.
Now it's time to glue the little box together.
Once I scored and glued the boxes together I filled them with jelly beans I mean Bunny noses.
I used MS Word to make the tags, changed the font color to brown, and then printed onto white card stock.
Next, I used my faithful SU punches to punch out the saying, and a scalloped circle from card stock to add to the tag. (Yes, I first printed the saying in green, but then decided that I liked them in brown better).
In order to add a little something to the tags I decided to pierce each of the scallops. (The foam piece that I am piercing on top of is from a set of brads that I bought ages ago. It works perfectly for piercing!)
I also used a brown marker to doodle around the saying and then glued the pieces together.
I tied green tulle around the boxes and tied a knot.
Then, I folded the tulle over itself, tied some twine around it (to make it into a bow), added some more twine loops, and then added the final knot.
I also added a tiny Prima flower with a brad and attached the tag with a 3D glue dot.
I have to admit that I had a hard time not eating all of the "Bunny noses!" I almost had to take a picture of empty boxes! :) A big thanks to the hubbie for running out and picking up some more!
Thanks for stopping by! I hope you all have an amazing Easter and get to spend time with the ones you love! <3 Kristy