Wednesday, September 28, 2011

CJ Too Design Team Post

Hello my crafty friends! Today's theme for our Craft Junkie Too DT post is FabulousFall ~ We were told to Make a project using the changing colors of fall as your inspiration... anything BUT a card. Well, I have the perfect project to show you all! I recently attended another Crafty Girls Crop and my super crafty friend Irene had this kit all ready for us to make up! When I walked into her house and saw this...I fell in {LOVE}! Here's mine:
Super cute Witchy Poo Welcome sign, right?!!! Love at all that glittery beautifulness! Don't these black boots make you want a pair of your own?!
Also LOVE what the tulle adds behind the sign!
No Halloween sign would be complete without a sparkly spider!
If you think this sign is freakin' adorable, you should see what else my super crafty friend creates! You can see her craftiness HERE! Thanks for stopping by today! I hope I was able to inspire you to create a fun fall project! Please hop on over to CJ Too to see what the other DT members made today! <3Kristy

Saturday, September 24, 2011

Happy Birthday cards

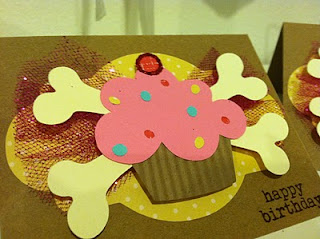
Happy Birthday to my "niece!" I made her a set of b-day cards that she could use and send out to friends...
 I used Pink by Design stamps and my Rock Princes cartridge.

 I added some sparkly tulle behind, and some glossy accents and glitter to the cherry!
Here they are all tied up and ready for Stinkerbella to hand out!
I thought that they were adorable, and she loved them! Thanks for stopping by today! <3Kristy

Friday, September 23, 2011

DCWV September Sketch Challenge

Hello my crafty friends! I have been sooooo busy with filling orders and chasing Little Stinkerbella around that I almost didn't get DCWV September's Stack-a-holic challenge put together.  When I saw the sketch I knew which picture I was going to use! Here's the sketch:
I'm not normally one for ONE photo layouts, but I did have a picture perfect for this layout. Yes, of course it has to do with Little Stinkerbella! ;) Here's what I came up with:
I used the DCWV All About Girls stack/cardstock stack and the Pastels stack. I cut the heart using the Calligraphy cartridge, and used Thickers for my title.
Seriously, just look at how cute these tiny feet are...
Thanks for stopping by today! My fingers are crossed! I'd love to win some more DCWV stacks! "Hello my name is Kristy and I'm a Stack-a-holic!" ;) Have a great day! <3Kristy

P.S.  Guess who I got to meet yesterday?
Yep! That's Teresa Collins! I was sooo excited! Can you tell by the BIG o' cheesy smile?!!!! If you're a scrapper and you LOVE anything that's blinged out then you know who Teresa Collins is! She is one of my biggest influences and someone that I just totally admire!

Wednesday, September 21, 2011

Frankly You're the Best!

Hello my crafty friends! I received my new Scrappy Moms "Bewitched" stamp set in the mail yesterday, and I just HAD to make a quick card! Look how cute this set is...
 I have a little tin pail that sits on my desk, and when ever I have "left overs" or pieces I didn't end up using I just plop them into the pail!
 My goal for this card was to use pieces I had in the pail and/or scraps of paper...mission accomplished!

This cute little guy has been waiting in that pail for almost a year! I think he goes perfectly with this adorable stamp! Thanks for stopping by today! <3Kristy

Tuesday, September 20, 2011

A sink bath layout...

Today's my day to be the guest designer over at She's a Sassy Lady. If you have a moment please hop on over and leave me a comment. Here's my post:

Hi everyone! This is Kristy from craftin-on-my-door and I want to thank Sheila for allowing my to be her guest designer again today! I look forward to my monthly She's a Sassy Lady posts!

If you are a follower or just stop by my blog you know that I just received my Imagine in July, and I'm in {LOVE}!

Why did I wait soooo long? I honestly thought I didn't (need) this machine?! Well, I was wrong! I have been creating project galore with this big beauty of a machine! The possibilities are endless with this amazing machine!

So, today I thought I would show you a layout that I created in about an hour and a half! (That's REALLY quick for me!) My goal was to only use "one" cartridge for all prints and cuts...sometimes I get a little overwhelmed with too many choices. I was hoping to create and finish a page quickly by setting a goal!
Here's what I used to put this page together, plus some tulle, adhesive, adhesive foam, a piece of 12 x 12 pink paper (yes, I know I could have printed the background paper too, but I'm trying to use up what I have), and some yellow scraps.
 I flipped the bathtub and print/cut it and all it's layers at 5". Then I reversed the flip and print/cut more bubbles for my pics.
 Then I selected this shape from the bonus content...
 and then flood filled the image with this fun light blue striped pattern paper. It was printed and cut at 10.6" (rel).
I glued the fun background shape (off centered) down onto my pink paper.
 I glued the first layer of the bathtub straight down to the background. Then I cut a piece of gold tulle, tied it in the middle with a piece of twine, and taped it onto the back of the next layer of the bathtub. I used Glossy Accents and chunky glitter on the bubble layers, and added some Glossy Accents to some of the bubbles. Then I used foam adhesive between each layer. I have to say...I'm lovin' how this turned out!
Next, I glued down a scrap strip of yellow Stampin' Up paper onto the middle of the page. Using my ATG glue gun I ran glue down the back of another scrap of the yellow paper and then folded the piece back and forth to create some dimension. I did this for 2 pieces and then cut a "dove tail" off of the ends. For the last step of these quick and easy borders just run another line of glue onto the flat scraps (that are already glued down) and stick your pleated pieces on top. Then I added the title using some Thickers stickers.
 I stuck my pictures down and added some more bubbles to some of the pics.
 To be honest with all of you, my handwriting is not my favorite. That's why I try to type or use stickers for a lot of my journaling, but I have come to realized that Little Stinkerbella will want to see "my" handwritten journaling one day! So, Little Stinkerbella this is for you...
That's it! Can you believe it, less than 2 hours! I challenge all of you to pick one cartridge and put together a quick, easy, and cute layout! If you do please make sure you stop by my blog HERE and leave me a comment with your blog link. I'd love to stop by and check out what you've created!
Thanks for stopping by today! <3Kristy

Friday, September 16, 2011

Tweetheart layout

Here's a layout I made a while ago of my little "tweetheart!" I believe that the scallop circle is from Elegant Edges. The bird is from Create a Critter, and the nest is from Straight From the Nest. I can't remember where the heart is from, maybe Simply Sweet?! I used Glossy Accents on the title.
Then I added some spots to my heart with a white gel pen.
A little doodling, a ticket, and some alpha stickers for Little Stinkerbella's age!
I also added Glossy Accents to the phrase on this strip of paper.
I cut the eggs twice, popped them up, and also added Glossy Accents for dimension.
A couple of accessories for the cute little bird, and I popped her up using foam adhesive.
 
I hope you enjoyed this fun and cute layout. Thanks for stopping by! <3Kristy

Thursday, September 15, 2011

Happy BIrthday...

to my hubby! Today is the hubster's bday so Little Stinkerbella and I put this card together for him.  I used my super fabulous Imagine (have I told you how much I love this thing?! Wait until you see the layout I did using it, in only about an hour!), the Imagine More cart, and the Birthday Bash cart. I've shared the story before that some friends close to our family call my hubby "Squirrel." So I thought that this would make a perfect card! This is a 5 x 7 card. The squirrel and layers were cut at 4.5". The little bday banner was cute at 2.8", and the large brown circle was cut at 4.9".


 I used foam adhesive to add dimension, and added  a small brown circle behind the sentiment. This little banner is actually from the llama page (41). Then I added a little twine to the bottom of the card.
Stinkerbella wanted to add her 2 cents and color inside. Of course I let her. Would you be able to say no to that little face? I love how she took her job so serious! She kept saying, "I color for daddy." So precious!


Thanks for stopping by today and Happy Birthday to the best Daddy and Hubby ever! We love you! <3Kristy