Tuesday, July 19, 2011

Make your own flower embellishments!

Today's my day to be the guest designer over at She's a Sassy Lady. If you have a moment please hop on over and leave me a comment. Here's my post:

Hi everyone! This is Kristy from craftin-on-my-door and I want to thank Sheila for allowing my to be her guest designer again today! I look forward to my monthly She's a Sassy Lady posts!

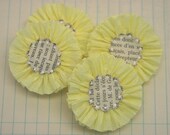
I was at a scrapbook store and saw some fun crepe paper flower embellishments, and I thought..."I can make those!" They looked kind of like this:
I decided to make mine more like roses, add some tulle, and some bling of course! Here are mine:
They were very easy to make, and all you need are some supplies.
First, punch some circles from card stock. The size you punch will be just a smidge smaller than your flowers. I did 2 different sizes.
Next, take the crepe paper and make a small ball. (There are a few different ways to make these flowers, and they each make different dimension.)
1. Twist the crepe paper around the small ball, and turn/roll the flower while twisting.
2. Scrunch the crepe paper while twisting around.
3. Twist, turn/roll, then scrunch...
When you get to the size you want just cut the crepe paper and fold under the flower. Add some hot glue to the card stock circles, and still that sucker down! ;)
Then, cut pieces of tulle (and cut each piece of tulle in half) and tie it in the middle with a small piece of twine. Cut pieces of ribbon and attach with twine. Again add more hot glue on the back and attach.
I curved some of the tulle so that the embellishments would work perfect on the corners of some of the pictures.
I was on my way to a fantastic Crafty Girls all day crop so I put my pictures, paper, and new embellishments into one of these fabulous scrapping envelopes, and I was ready to go! I got the idea from my SUPER crafty friend, Irene! I had about 10 of these made up and ready, but only got through a few of them.
I also used my Kiwi Lane Design "brackets" for this layout. I just ordered and received the small brackets and they are perfect for journaling next to pictures! (By the way, they are having a 50% off sale right now!)
Then, I laid out my pictures and paper.
I wanted to add a little something to one of the important pictures, so I used some Zip glue lines and ruffled some tulle. I didn't bring my tulle with me so I needed to borrow from a friend (isn't that the best thing about going to crops?!), thanks Stephanie! As you can see I also doodled around the brackets, strips, and some of the pictures.
I had these pictures and idea for the layout for a while, but finally had time to sit down and put it all together! The story behind this layout is a cute one. One of our dogs, Hope, has just {LOVED} Little Stinkerbella ever since we brought her home. I think that she thinks she is her little puppy! When Stinkerbella was very tiny and I would prop her up on the couch to change her or take a picture, Hope would jump up onto the couch and put her paw or puppy face over Stinker's lap. We always called this a "Hope seat-belt!" Here is the final layout:

Back away from my baby, Lady... (ha ha ha!)
I used my Gypsy for Hope, and seat-belt.  "Hope" was cut using Don Juan. For seat-belt I used one of my favorite, go-to fonts for welding which has been the Wild Card cartridge.
Did you notice the difference between the rolled roses and the scrunched roses? One last peek at the handmade flower embellishments:
Thanks for stopping by today! I hope you all take a few moments to make some embellishments of your own, and if you do {please} pop on over to my blog and leave me a comment/link so that I can check them out!
<3 Kristy

Friday, July 15, 2011

10 years!

**This card was made for the Pumpkin Spice DT call!**

So, yesterday (Thursday) was the hubster's and my 10 year wedding anniversary! If only I still looked like this:
Can you see the crinkle in the middle of the pic?? Just as I was about to snap a picture of it (so that I could upload it to FB and tag everyone in it!) Stinkerbella snatched it and ran! Boy is she quick! I like to call this 20 month old phase "tornado!" Okay, back to the card...Here's a little something I whipped up for the hubster:
We {love} the beach and used to live so close to it, so when I saw this stamp set by Scrappy Moms I knew I needed it for this card! Here's the set I used, it's called "Sun Kissed."
I stamped the sentiment and then punched it out with one of my SU oval punches.
This is a 5.25" x 5.25" square card. The background circle is from Accent Essentials. The sun and clouds are from the Pop up Neighborhood cartridge. The surfboards, waves, and starfish are from Life is a Beach. The "sand" is actually snow from Jolly Holidays.
I added some thin twine to the bottom of the card and to the sentiment, inked everything in Tim Holtz' Tea Dye ink, and TONS of foam dimensionals.

My favorite paper right now is Echo Park Paper (not used on this card, but I just picked up some cute pieces of the Country Drive line and will be posting something soon!)
Happy Anniversary to my HOT hubby! I love you tons, (and if possible I think I've fallen in love all over again...just watching him with our daughter)! Boy, I sure wish I had a piece of this cake...yum!
Happy crafting <3 Kristy
Linking/challenges:

Sunday, July 10, 2011

Sweetie Pie layout

Here is a layout I made for the hubster for Father's Day! Just look at the shirt Little Stinkerbella is wearing, it says "My Dad Rocks!"
I used the following cartridges:
*Elegant Edges
*Just Because Cards
*Country Life
I doodled around the title, added stickles to the cherries, and bling!


I didn't have any red and white polka dot paper, so I made my own. I used a hole puncher with whit paper, and then added bling to each circle with my i-rock!
I also added green tulle behind the border for some more dimension.
Doodled around some of the photos, added ribbon, and a fun pin.
I used some stickers for journaling.
Using the Cuttlebug Divine Swirls folder and a crimper I embossed this cute pie.
This cute outfit came from one of our favorite families...thanks Coopers! We love you guys!
 
Here's to all the Rockin' Dads out there! <3 Kristy

Friday, July 8, 2011

Silent Night LO

A little Christmas in July for you! I did this layout a while ago, but decided to save it and share it with you in July! "Silent Night, O Holly Night, with a baby...yeah right!" he he he
I used my Gypsy and the Wild Card cartridge for the wording (I LOVE this font!) I also added some bling to each of the letters (thanks to my crafty friend, Kindon, I was out of little red bling!)
I added flowers, leaves, and blinged out brads. The glitter paper is one of my favorite Christmas papers.
LOVE this pic, it says it all....
 
I hope you all have some crafty time set aside for this weekend! We are on our way  out of town again for one of my best friend's baby shower. Just wait until you see the onesie I made for her new little one! Can't wait to show it to you all! <3 Kristy

Wednesday, July 6, 2011

CJ Too Design Team Post

Hello my crafty friends! I hope you all had a great 4th with your fam! Today's Craft Junkie Too design team post theme is anything! We were to make a project of our choice! I have decided to showcase a banner that I made this past week. The hubster's brother and finance had a little baby boy (and boy is he a cutie!!!)

Here is a banner that I made for his nursery:

I looked up his  nursery bedding collection online and tried to match it the best that I could. :)
I used Birthday Bash for the banner, Birthday Cakes for his name, and Create a Critter for the jungle animals. I cut all the pieces and laid them out.
The lion on little Luke's bedding has many layers on his mane. So I cut the mane in 4 different colors, cut pieces to match, and fringed the ends.
The monkeys on his bedding have stripes on their legs, arms, and tails. So I cut extra legs, arms, and tails onto off white paper and drew stripes onto all of them.
Here's a picture of the bedding and matching monkeys.
Here are each of the pieces of the banner:
I hope his mommy {loves} it! Thanks for stopping by today! Please hop on over to Craft Junkie Too by clicking HERE and see the other DT projects!
<3 Kristy

Linking up to:


Friday, July 1, 2011

Kiwi Lane Sidewalk Sale!!!!

 
Have you heard?! Kiwi Lane Designs is having a SIDEWALK SALE!!!! Click HERE to get 30% off of a 4th of July paper kit and TONS of their fabulous templates!!!

Happy 4th!  <3 Kristy