Monday, October 31, 2011

Pizza and Pumpkins...

Happy Halloween to all my crafty friends! Last night we went over to one of our favorite families' house for pizza and pumpkin carving night! I used my E2 and the Pumpkin Carving cartridge to transform our little jack o' lantern! (My friend and her daughter did too, but I'll have to get pics of their fabulous jacks tonight, the ones I took didn't turn out!)

Here's the hubster (cutting out the bottom of the pumpkin, a little Martha Stewart trick) and Little Stinkerbella (playing with our stencils).
 She did NOT like the the "pumpkin guts!" She said, "Eww, gross!" (Wish I would have caught that face on camera!)


 Here he is in the light...
 and now with a candle in the dark. I like how he's cute and goofy! Little Stinkerbella said, "That's scary!"


 BOO to all of you...


 Happy Halloween from our family to yours! I can't wait to show you all her Halloween costume! ;)
♥ Kristy

Saturday, October 29, 2011

The CJ Too Halloween Blog Hop...

Tracy (Craft Junkie Too) and her wonderful designers are having a blog hop!! We'd love if you hop on by to see our terrific crafty Halloween, don't forget to leave comments for your chance to win blog candy along the way.

We are a short hop, only nine crafters long... so it won't take long... and you won't want to miss the fun! :)

Hello my crafty friends and welcome to the Crafty Halloween Blog Hop! I really wanted to make a little Halloween home decor project. I found a cute idea on Pinterest and then put my own spin on it! I made one for Little Stinkerbella's grandparents too!
I bought a value pack of canvases.
Painted the top and sides all black...
Then my super fabulous and crafty friend, Christianna, helped me paint Little Stinkerbella's foot and stamp them onto the canvas. (I put books under the canvas to make it flat, but she is little and a stinker and no matter how hard I tried to get her not to wiggle her little toes, she still did!  I think that they all still turned out cute!)
I wrote her name and the date, a sparkly ribbon bow, and added some fun polka dot ribbon to hang them.


Thanks for stopping by today and I hope I inspired you to make a little something Halloweenie for your home! Make sure you stop by and see what the other CJ Too Design Team members have whipped up. ♥ Kristy

Here's the entire line up:

Tracy @ Craft Junkie Too
http://www.craftjunkietoo.com/

Cheryl @ CardsbyCG
http://cardsbycg.blogspot.com/

Indira @ Crafty Homemade
http://www.craftyhomemade.blogspot.com/

Kadie @ Kards by Kadie
http://kardsbykadie.blogspot.com/

Kristy @ Craftin' on my Door
http://www.craftin-on-my-door.blogspot.com/

Roberta @ TX Scrapper Mom
http://www.txscrappermom.blogspot.com/

Shawn @ Shawn's Fireside Crafting Room
http://www.shawnsfiresidecraftingroom.blogspot.com/

Shelley @ Carley's Closet
http://www.carleys-closet.blogspot.com/

Tanya @ Tanyaisis Creations
http://tanyaisiscreations.blogspot.com/

Monday, October 24, 2011

So Berry Sweet...

Hello my crafty friends! As some of you know I went to an Imaginisce class (using Santa's Little Helper!) at the Pre-IU event in September. It was so much fun and as soon as I finish up the project I will be sure to post some pics! While I was there I picked up some SUPER cute Imaginisce paper from the Berrylicious line. I thought that this paper would be perfect for their October Sketch challenge. Here's the sketch:
And here is what I came up with (of course using pictures of Little Stinkerbella):
 I used my Gypsy and a couple Cricut cartridges (Elegant Edges and Sweet Treats) to make the scalloped circle background and the hearts. Using Glossay Accents I added some chunky glitter to some of the hearts and cute little strawberries.
 I loved this little journaling sticker, Sweet & Tart! This was just perfect for Little Stinkerbella! I thought and thought about what to write and here's what I came up with... You are 75% sweet, 25% tart and 100% ours! ♥(As of April 11th the adoption was finalized!!!)♥
 On the title I used the super fab i-rock to add some bling, and I added some tulle and foam adhesive for dimension.

 I just {love} this paper line!


 My fingers are crossed! I would LOVE to win two full collections of Imaginisce papers!!!!

I have tons of new layouts to show all of you...more to come soon! ♥ Kristy

Wednesday, October 19, 2011

DCWV October Sketch Challenge

I was soooo excited to see that I had won DCWV top 10 again, this time for September's challenge! I love the sketches and it helps me to catch up on my scrappin'! Here's DCWV October Stack-a-holic Template Challenge sketch:
And here is my take on this sketch:
I used the Green mat stack and the Eco stack for this layout. I also used some Thickers and Making Memories canvas letters for my title.
 I used my corner chompers, Tim Holtz ink,  a couple star punches, and some brads to add to this page.


This is a special page to me. This is the first time that my husband's dad "Papa Luke" met Little Stinkerbella. She definitely put her magical spell on him, and had him wrapped around her finger! ;) I'm so glad that I caught this special moment on camera! Thanks for stopping by today! My fingers are crossed to be chosen for this month's free stacks! ♥ Kristy

Tuesday, October 18, 2011

3 x 3 Halloween cards...

Today's my day to be the guest designer over at She's a Sassy Lady. If you have a moment please hop on over and leave me a comment. Here's my post:

Hi everyone! This is Kristy from craftin-on-my-door and I want to thank Sheila for allowing my to be her guest designer again today! I look forward to my monthly She's a Sassy Lady posts!

I love all cute Halloweenie type things! Today's post would be perfect for a teacher, a friend, or a friend hosting a Halloween party! This little card set is cute, fun, and quick!

 Here's what I used:
*Sticker set from Michaels
*1 piece of 12 x 12 black paper
*Scallop circle and circle punch from Stampin UP
*Tim Holz black soot distress ink
*SU white craft ink pad
*Scrappy Moms Bewitched stamp set
*Pink Paislee  6 x 6 Hocus Pocus paper pack
*Orange and Black twine


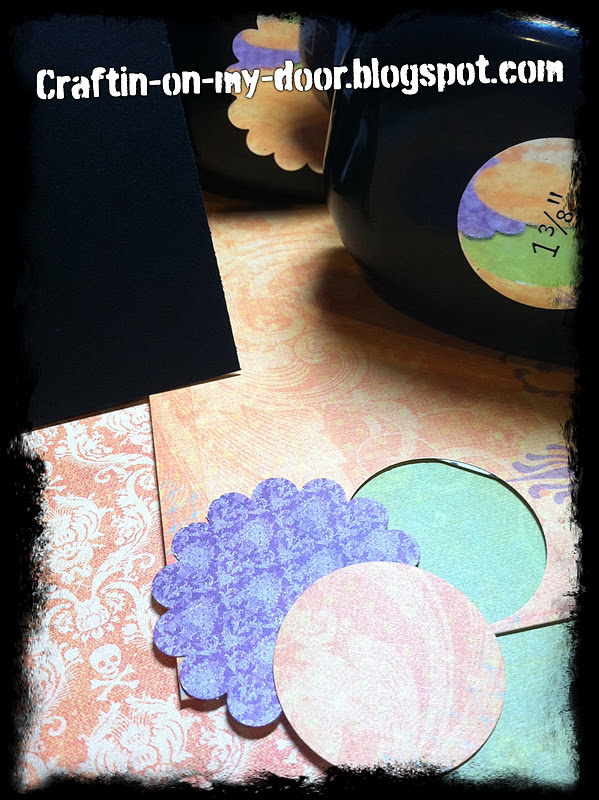
 First, cut the black paper into 6 pieces of 6" by 3".
 Score each piece at 3"....
 and fold in half.
 Punch out a scalloped circle and a circle for each card.
 Ink the edges.
 Place a sticker onto each of the circles and a piece of foam adhesive onto the scalloped circle.
 Next put the two pieces together.
 Then tie the twine onto each card.
 Then stamp your chosen sentiment onto the bottom of each card.
 Finally attach each embellishment with some more foam adhesive.


 I think they turned out pretty cute, and I {love} how quickly they went together!
Thanks for stopping by today! <3Kristy